Tuesday, September 23, 2008

Grilled lamb rib chops with redcurrant glaze


A while back I got this cookbook at Costco.
It was a total impulse buy.
It had a lot good pictures, a wide variety of recipes and, best of all, the title:

The cover says it has "400 fuss-free and fast recipes - breakfasts, appetizers, lunches, suppers and desserts using only four ingredients or less."

I quickly got past the fact that it should be "four ingredients or fewer" and bought myself a copy.

As I have said before, I am a cookbook junkie. This was a great find, I was sure.

Then I put it in the cabinet with the rest of the cookbooks and forgot about it.

Until Sunday. I was in the mood to try something new, and I had decided on lamb.

I have never made lamb before, but recently had a great dish at a little place, Bistro 767, not far from my house. They had a yummy appetizer of lamb "lollipops" with cherry glaze and black bean hummus.

It was the perfect combination of salty and sweet and grilled.

So I decided to try this at home.

And to my surprise there was a recipe in this cookbook that sounded pretty similar, minus the black bean hummus.

And with only four ingredients!

By the way, salt and pepper do not count toward the ingredients. They are in the recipe, but I guess since they are sort of stock items, they don't count.

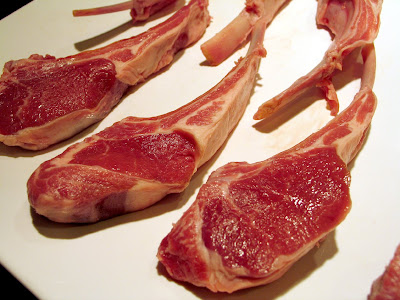
So... My lamb experiment... I modified it a bit from the book. The original recipe called for lamb steaks, but the store did not have those. So I got rib chops, which are more like the little "lollipops" I had at the restaurant.

Grilled lamb rib chops with redcurrant glaze
Serves 4

5 large fresh rosemary sprigs
12 lamb rib chops
(they look small, but three each is plenty with side dishes, etc.)
5 tablespoons redcurrant jelly
2 tablespoons raspberry vinegar
(red wine vinegar is also listed in the book, but I had raspberry, so that is what I used)

salt and pepper to season/taste

Strip the rosemary leaves from stems and chop into very fine mince.
Season chops with salt and pepper and rub rosemary onto chops.
Preheat grill on high.
Melt redcurrant jelly in small pan over low-medium heat. It should not boil, just melt.
Stir in vinegar.

Reserve about 1/4 of glaze for serving.

Brush one side of chops with glaze and place, glaze side down on grill.
Cook about 3 minutes, brush glaze on uncooked side, then turn.
Cook about 3 minutes more or until to desired doneness.

To serve, place on plates and drizzle with a little of the reserved glaze.

These were not exactly like the restaurant chops. I think they used more salt and pepper.
Since this was the first time I had made lamb, I was cautious about over seasoning it.
It was still very good, still that sweet and salty flavor.
But next time I might go for it a little more, especially with more pepper.

Even though it was not the same, it was still pretty freaking good. An experiment that went quite well.
And I will take a closer look at that cookbook for more ideas.

Monday, September 22, 2008

Tomatoes stuffed with herbed rice


This was a very easy side dish made easier by using that boil-in-a-bag type of rice.
I like Uncle Ben's. It's easy and the rice does not get too mushy.

One bag should be enough to stuff four medium-size tomatoes.

The other good thing about the prep can be done ahead and then they can be baked when you need them. They also can be served at room temperature. Which is what I did.
I made the tomatoes and then while they were cooling a bit, made the rest of the dinner.

Here's what I did.

Tomatoes stuffed with herbed rice

1 bag Uncle Ben's boil-in-a-bag long grain rice
1 teaspoon plus 2 tablespoons olive oil
4 medium tomatoes, ripe but firm
3 tablespoons fresh basil, chopped
2 tablespoons fresh Italian parsley, chopped
1 garlic clove, minced
2 tablespoons fresh lemon juice
1/4 cup fresh Parmesan cheese, grated
salt and pepper

Cook the rice according to package directions, then rinse with cold water to cool.
(I actually used half white wine-half veggie broth instead of water to cook)

Heat oven to 350.
Lightly coat baking dish with 1 teaspoon of olive oil.

Cut a slice, about 1/2 inch thick, off the top of each tomato, saving the tops.

Scoop the seeds, juice and flesh out of each tomato into a small bowl and set aside.

Place hollowed-out tomatoes in baking dish.
If they do not sit steady in the pan, flatten the bottom by cutting off a thin slice.

To the cooled rice add:
1/4 cup of the reserved tomato flesh
2 tablespoons of olive oil
basil
parsley
garlic
lemon juice
Parmesan cheese
salt and pepper to taste


Spoon rice mixture into each of the hollowed-out tomatoes.
Replace reserved tomato tops.

Bake about 20 minutes or until rice is heated through and tomato softens.

These can be served hot or at room temperature.
They can be made up to 4 hours ahead of time, which gives you time to work on the rest of the meal.

I made mine about 90 minutes ahead of time and they came out great.
I tasted the rice right from the oven and it was good, but I think letting them sit and cool a bit brings out the fresh herb flavors even more.

Wednesday, September 17, 2008

Tilapia wth tarragon butter and Swiss chard


I have this little addiction to cooking magazines.
It's been a problem for years.
What I do is I look through them, tearing out recipes that look interesting to me.
I have accumulated quite a collection of torn out magazine pages over the years.

To organize these, I have several three-ring binders for various categories: appetizers, side dishes, entrees, pastas, desserts... just to name a few.
Then I put the magazine page into a clear page protector and put it in the binder.
Basically, my own customized cookbooks.

The problem is sometimes I forget about these binders for months at a time.
Then I go back to them and pull out a few things I want to finally give a try.

I did this recently, and this is one of the recipes that sounded good to try.
I served this with a simple rice pilaf on the side.

I am not sure when or where I found this recipe originally. But it has tilapia, which is an easy fish to cook, and chard. I like chard. It's a little bolder than sauteed spinach. It's got a little more flavor and bulk to it. If you don't like chard, spinach would work, too.

Plus with a sauce that includes tarragon and shallots and lemon juice...? Yeah. Sold!

Seems like lately I have been very into things with sauces. The little pan sauces that are not difficult to make, but can make a dish taste so complete.

So...


Tilapia with tarragon butter and Swiss chard
Serves 2

1 tablespoon olive oil
2 cloves garlic, minced
1 pound Swiss chard
(cleaned, fibrous stems removed and ribs discarded, leaves coarsely torn or chopped, washed and dried. **See note below about cleaning greens like this**)

Sea salt and freshly ground pepper
5 tablespoons butter
2 tilapia fillets, about 6 ounces each
1 shallot, chopped
1 tablespoon fresh lemon juice
2 tablespoons fresh tarragon, chopped

Before you do anything else, make sure the chard is cleaned and dried and ready to go.

Also, once you start this, it all goes very fast. So you will want to have all the ingredients prepped and ready to go in the pan before you start cooking.

Heat oil in a large nonstick skillet on medium-high heat.
Add garlic and cook about 30-45 seconds, until fragrant, but not browned.
Add a large handful of chard and cook, tossing often.
Once this settles, add more chard and continue cooking and adding until it is all in the pan and cooked until tender, about 3-4 minutes.
Season to taste with salt and pepper.
Divide chard onto two dinner plates and cover with foil to keep warm. Set aside.

Wipe out the skillet to remove any excess liquid.
Add 2 tablespoons of the butter and let it melt over medium-high heat.
Season fish with salt and pepper, and place it in the skillet to cook.
Cook fish until golden brown and cooked through, turning once.
It will take about 4-6 minutes of total cooking time.
Remove fish from the pan, placing it on top of the chard. Cover to keep warm.

In the same skillet, add the shallot and cook about 30-60 seconds, stirring occasionally.
When shallots are just starting to brown and soften, add lemon juice.
It should evaporate pretty fast, if not cook until nearly evaporated, maybe 30 seconds.
Remove pan from heat and add the remaining butter and the tarragon.
Stir constantly until the butter melts and makes a sauce.
Season to taste with salt and pepper.

Pour sauce over the fish and chard and serve.
**I wash chard like I do spinach or pretty much any other greens... Oh yeah, works great for leeks, too.
Once you have it torn or cut into the pieces you want to cook, put the greens in a large bowl or basin, cover with cold water and let sit for at least 15 minutes.
Any sand or grit will settle to the bottom of the bowl and the greens will float to the top.
Use a slotted spoon or your hands to gently scoop the greens off the top of the water.
Place in a colander and rinse one more time.
To dry these, a salad spinner works great, or just let them air dry.**

Tuesday, September 16, 2008

Caprese salad - or tomatoes with mozzarella cheese


One of my favorite easy salads is a simple concoction of tomatoes and mozzarella cheese.
I have had this in various forms: thick slices of large tomato layered with slabs of mozzarella cheese; tiny tomatoes with creamy white pearls of mozzarella; chunks of juicy romas with long shreds of cheese on top.

All are were slightly different, but all were good.

I even had one at a great restaurant in Sonoma wine country that used a mild sheep's milk feta instead of the mozzarella.

I have not had a Caprese salad in quite a while. I used to order it at restaurants a lot, but once I started making it at home, I sort of stopped that. I like how easy it is to customize this to what I am craving.

Yesterday while I was at Whole Foods picking up a couple things for dinner, I saw this little basket of mixed tomatoes.

Red, orange and yellow... all beautiful and bite-size.

It was too pretty not to buy.

And the idea of sweet little tomatoes with creamy fresh mozzarella began to sound lovely.

I used white balsamic vinegar. Regular balsamic works in this, too. It will just be a little darker and a slightly heavier flavor. You also can just use a bit of your favorite Italian dressing or vinaigrette.

Also, the herb I use depends on what looks best or what flavor I want. Sometimes I use basil. This time I used oregano.

Sometimes I use a little garlic. This time I did not. Again, it is all what the mood calls for.

In the past, when I have made this with large tomatoes, I have used the drier type of mozzarella, cut into slices to place atop the tomato slices, then top it with the dressing.


More often when I make this I use the mozzarella that comes packed in water. I like the texture better, and the flavor. This time I bought mozzarella pieces the size of cherry tomatoes.

Here is the simple version I made last night. I did not really measure this stuff. It's a taste thing for me. The sweetness of the tomatoes will determine how much or little salt and pepper and herbs I add.

Let your taste buds and the number of people you want to serve be your guide here and make it to your liking.


Jill's late-summer Caprese salad

Red, orange and yellow grape/cherry tomatoes
1-2 tablespoons fresh oregano, chopped
olive oil
white balsamic vinegar
sea salt flakes and fresh black pepper to taste
fresh mozzarella cheese

Wash tomatoes, remove any stems then cut each in half and place in a bowl. You want the juices here. They combine with the oil and vinegar to make the dressing.
Season lightly with salt and pepper.
Add a splash of the oil and vinegar and toss gently.
Then try it, and adjust to your taste.
Add the oregano.
Taste it again. Adjust the seasoning and oil and vinegar as needed.

You can serve this immediately or let it sit a while. I put mine in the fridge for about an hour.
I also made a little extra to have for lunch the next day. It will keep overnight just fine.

To serve I cut the mozzarella pieces in half and put them on a small plate.
Then I spooned tomatoes on top of that and drizzled some of the oil/vinegar mixture over that.

The oil and vinegar mixed with the juice from the tomatoes makes a good amount of dressing for this.

I added a piece of a good crusty bread to the plate and used that to mop up some of that dressing.

It was an excellent starter to dinner. It's light, but substantial with the cheese in there. The flavors are so fresh and so bright and clean. It's a perfect, beautiful late-summer plate.

Monday, September 15, 2008

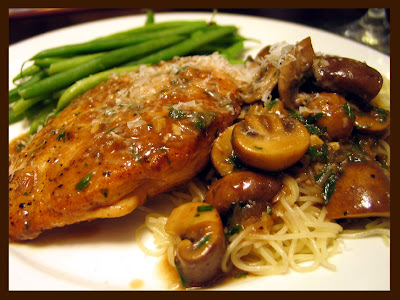
Chicken Marsala

I love chicken. It's just so easy.
But it can get boring to have it the same way over and over.
So I like to mix it up.
And really, it's not that tough.

Last night I made a dish I have had several times at different restaurants, but had never made at home: Chicken Marsala.

Basically this is sauteed chicken breast cutlets in a mushroom sauce flavored with Marsala wine.
I served this with some capellini pasta and simple steamed baby green beans.
It was a very easy meal to make. Restaurant food at home!
Why do I eat out again?
Oh yeah... Then I don't have to do the dishes.

I planned on one piece of chicken for each of us and then a couple extra for leftovers for lunch today.

Chicken Marsala
(4 servings)

4 chicken breast steaks or boneless, skinless breast pieces pounded to about 1/4 inch thick
salt and pepper
4 tablespoons unsalted butter
2 tablespoons olive oil
2-3 cloves garlic, minced
1 large shallot, finely chopped
6-8 ounces mushrooms, sliced or quartered
(I used 6 baby portabellas and the rest were small Italian brown mushrooms. I cut the baby portabellas into eighths and the small brown mushrooms in half. White mushrooms would work fine for this, too.)

1/2 cup sweet Marsala wine
1 fresh rosemary sprig
3/4 cup chicken broth
2 tablespoons Italian parsley, chopped
Season the chicken cutlets with salt and pepper.
In a large skillet, melt 2 tablespoon of the butter with the olive oil on medium-high heat.
Cook the chicken until golden brown on each side, mine took about 2 minutes on each side.
Transfer to another dish and cover. Set aside.
In the same pan, melt 1 more tablespoon of the butter and add the garlic and shallots.
Cook about 30 seconds.
Add the mushrooms, season lightly with salt and pepper and cook about 3 minutes.
Mushrooms should be tender and the juice should be cooked off.
Add the Marsala wine and the sprig of rosemary.
Cook until wine reduces by about half, 2-3 minutes.
Add the chicken broth and cook about 5 more minutes or until broth is reduced by about half.
Stir in parsley.
Add chicken and any juices back into pan and cook about 1 minute, until heated through.
Remove and discard rosemary sprig.
Stir the last tablespoon of butter into the sauce and season to taste with salt and pepper.
Enjoy!

Top: Baby portabellas
Middle: small Italian brown
Bottom: portabellas,
cut into eight pieces each

Monday, September 8, 2008

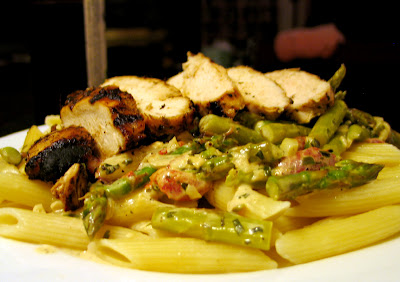
Penne in vodka cream sauce with asparagus and grilled chicken

I have this favorite recipe that I have been making for years.
It is a great date meal.
Penne with smoked salmon in vodka cream sauce.

One of these days I will post that recipe here.
For tonight, I am posting a variation of it I made for dinner.
I did not follow the recipe to the letter, I just went by memory on some things and the rest was pure experimentation.

For example, the original recipe has penne and vodka and cream and Parmesan cheese, as does this recipe.
But that is about where the commonalities end.

One of these days I will post the original recipe. It's really a great dish. And easy.

Now, let's see if I can remember what I did and if I can read the notes I was making as I cooked.

This recipe might be a little more free-form than normal.


Penne in vodka cream sauce with asparagus and grilled chicken (serves 2)

for chicken:
2 boneless, skinless chicken breasts
olive oil
white balsamic vinegar
dried herb mix, whatever is your favorite
salt

Sprinkle chicken with herb mix and salt
Coat in olive oil
Drizzle on a little of the white balsamic vinegar

I let this sit about 30 minutes while I chopped the veggies for the pasta and let the grill heat up.

Just before I started cooking the sauce, I put the chicken on the grill and cooked it until done. This will depend on the size of the pieces. I didn't really time it. They were done before the sauce, which took about 15 minutes to cook. I just took them off the grill and let them rest.

So, about those veggies and the sauce...

for the pasta and sauce:

Penne pasta, whatever brand you like
Cook your penne according to package directions, drain and set aside

1/4 cup red onion, thinly sliced then cut into smaller pieces. Not exactly minced, but not long strands. About 1/4 - 1/2 inch long pieces

3 cloves garlic chopped, but not minced too finely


15-20 asparagus spears washed and broken in to 1/2 inch pieces

1/4 cup roasted red pepper, diced. I used the stuff in the jar. Just make sure to get the kind packed in water, not vinegar.


2 tablespoons olive oil
1 tablespoon dried tarragon or whatever herb you like, then more to make it to your taste
1/2 cup vodka
1 cup cream
2 tablespoons grated Parmesan cheese
salt and pepper to taste

Heat oil in medium heat in a large sautee pan.
Add onion, garlic, asparagus and red pepper.
Cook about 5 minutes.

Add dried tarragon or other herb.
Add vodka.
Cook about 5 more minutes to let the alcohol burn off.

Add the cream and Parmesan cheese and let cook until it starts to thicken just a bit, maybe 5 more minutes.
To serve I put some pasta on the plate, spooned the sauce with veggies over it and then topped it with slices of the grilled chicken.

It was great.
I think it would have been good without the chicken. With the veggies and the cream sauce this was a pretty filling dish. And using peas instead of asparagus would be good.
Or tomato instead of red pepper.
Or pretty much whatever you like. Ahhh, the beauty of experimenting.
Go on, play with your food!

So, that is it. My experimental dinner.

It is fun to try new stuff. And even better when it doesn't suck.

Friday, September 5, 2008

Vietnamese-style summer rolls


OK, I will not claim that these are authentic Vietnamese Summer rolls.
But they were good. And, other than the chopping, they were easy to make.


Vietnamese-style Summer rolls

1 medium carrot - julienned
1 small cucumber - peeled, seeds removed and julienned
1/2 cup bean sprouts
4 to 5 green onions - julienned
1 bunch cilantro leaves
1 tablespoon soy sauce or Ponzu sauce
1/2 teaspoon fish sauce (optional)

1 package thin rice noodles - optional - (I used mee krob type)
Cook about a handful of these according to package directions and let cool.

8 (8-inch) rice sheets (plus more in case some tear)
Warm water, for soaking rice sheets

So here, we go... a little picture show on making summer rolls.


First get all your veggies cut up and ready to go.

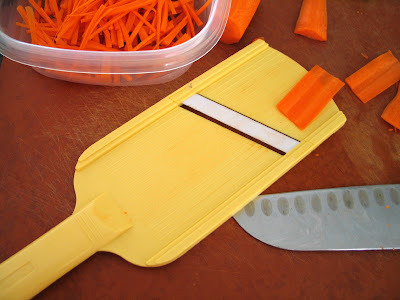
As I pointed out in the previous post, I find this ceramic blade slicer very handy.

I sliced the veggies thin, then used a chef's knife to cut the julienne strips.


Thin, thin, thin.
This did not work for the green onions though. I just used the knife for that.

Once all the veggies are chopped, combine the carrots, cucumbers, green onion and bean sprouts. Toss with soy or Ponzu sauce.

Assembly goes pretty fast, so you want to have all your ingredients on hand.
Have veggies, noodles and cilantro ready.

The rice sheets are dry and stiff and must be reconstituted in warm water.
I used a small sautee pan of warm water, just from the tap. No need for boiling. You will be working with your hands in this, so it should not be too hot.

Soak one sheet at a time in the water until the sheet is soft and pliable. If there are any large holes or tears, discard and start with a new sheet.

Carefully remove sheet to a work surface and spread it out as flat as possible.
This is where you need to work somewhat quickly so the sheet does not get too dry and stick to the surface.

In the center of the sheet, sprinkle some cilantro leaves.

Add a small portion of the noodles on top of that, then top with some of the veggie mix.

Fold one end then the other over, like above. Then fold a third side all the way over the veggie mixture. From here, roll it up tight like a little burrito. The last side should basically stick to the outside of the roll and seal itself.

To serve, I cut them in half and served with a few things: peanut sauce, hot mustard, red chili sauce and Ponzu mixed with a little honey.

These were vegetarian (no fish sauce in mine), but I think they would be good with some cold, cooked shrimp in there.

This was an experiment, but it was a fun one that turned out to be a tasty one, too. Use what you like, basically.
These were great as a starter. And with the leftover ingredients, I was able to quickly assemble a couple for my lunch the next day after diving.

OK. That's all I got for today.

Monday, September 1, 2008

Gadget: Ceramic blade slicer


For a while now I have been wanting to post some entries about some of the handy little kitchen tools I love and use on a regular basis.

I am a big believer in really getting my hands into making a dish, but sometimes the right tool really is a help in the kitchen.

One of my favorite tools is a ceramic blade slicer.

I got this several years ago at Williams-Sonoma.
The brand is Kyocera. Yeah, the same Kyocera that makes cell phones.
Go figure.

I like this took because it makes super thin slices of pretty much any veggie you want.

I used it to make thin carrot slices that I then julienned for summer rolls.
I use it a lot to slice onions for just about anything.
I like the thin, thin, thin slices. They add flavor to a dish without big chunks of onion.
I really don't like biting into something and ending up with a mouth full of onion.

It makes great slices of potato for chips.

It makes great slices of zucchini and mushrooms for the grilled pizzas I like.
The veggies cook very fast this way.

I have used it to slice apples to make a filo-apple tart.

It's not like I couldn't do all these things with just a knife, but this makes it easy and fast to get nice, uniform slices that are thinner than the blade of my chef's knife.

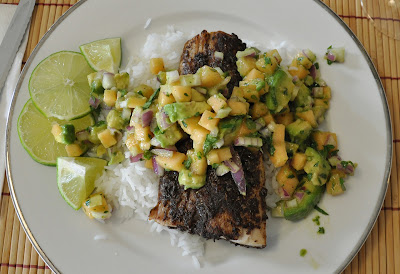
Jerk-spiced grilled mahi mahi with avocado-melon salsa


Spicy, tangy, crispy, creamy and sweet.
These all describe the grilled fish I made last night.

After a four-store hunt for mahi mahi, it finally came together.
The result was a light and tasty fish dish that also was super, SUPER easy.

Jerk-spiced grilled mahi mahi
with avocado-melon salsa


salsa

1 small avocado, ripe but not mushy, peeled and diced
1 cup cantaloupe, diced
1/2 cup red onion, diced
1/3 cup fresh cilantro, minced
3 tbsp fresh lime juice
3/4 tsp lime zest

salt and pepper to taste

Gently toss all ingredients to blend. Season to taste.
Keep in fridge until ready to use.

Now for the fish...
You can use any jerk seasoning you like, whether you make it or buy it.

I made mine this way:

jerk seasoning

2 1/2 teaspoons dried oregano
2 teaspoons ground allspice
2 teaspoons ground black pepper
1/2 teaspoon ground cinnamon
1/2 teaspoon cayenne pepper
1/2 teaspoon salt
2 tablespoons vegetable oil

4 6-ounce mahi mahi fillets

Heat grill on high.
I used a solid cast-iron grill pan on my gas grill for this. This way I could flip with no worry about the fish falling through the grill.

In a small bowl, stir together the oregano, allspice, ground black pepper, cinnamon, cayenne pepper, and salt. Add oil and mix to make paste then rub seasoning onto fish, coating completely.

Once grill is very hot, put fish on the grill.
Cook about 4 minutes and flip.
DO NOT mess with the fish until it is ready to flip. This will help reduce breakage.

Cook on the other side until fish is opaque in the middle, about 4 more minutes.

Serve with salsa.

The lime juice in the salsa is a good acid for this.
The fish is spicy and a little crisp.
The salsa adds sweet with the melon, creamy with the avocado.

It was a fabulous combination.

I would try this seasoning and salsa on chicken and expect it to be good.
It even sounds like something that would be good on steak, especially a nice thin carne asada type.